Particle Attachment
Particle Types
Each particle system in Dota is designed for a certain purpose, for example:
- Buff/Debuff or Ambient effect
- Explosions and other limited-time effects
- Circle AoE Indicators
- Line Indicators
- Projectiles (Linear or Tracking)
- Others
When attempting to use some of the available particles, keep in mind what was the original behavior of it.
For example if you try to use a projectile particle as a buff, or an explosion as a projectile, you will get disastrous or just no effect at all.
You can browse particles in the asset browser, for filtering just write keywords like "particle" or .vpcf.
Also every time you use a particle, remember to add them in a datadriven precache block on the ability:
"precache"
{
    "particle"  "particles/units/heroes/hero_magnataur/magnataur_shockwave.vpcf"
}Else you won't see them unless they belonged originally to the hero that is casting them.
Parents and Children
A Parent Particle is indicated by a P in the Asset Browser.
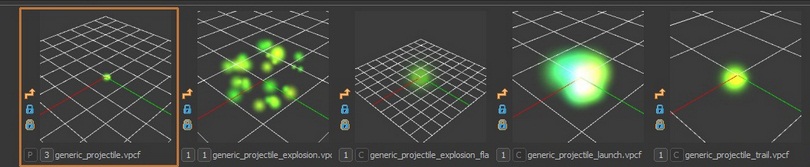
You normally want to use a Parent because it will show the complete particle effect. Children are harder to display and might not show or display properly.
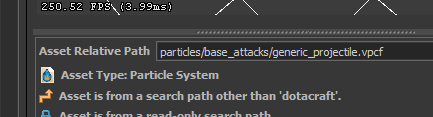
Copy this entire path for the particleName
Attachments
Particles need to be attached to some entity location to begin their behavior. This can be as easy as a single "Target" "TARGET" line, or contain many weird attach points that you will need to discover through numerous trial and error attempts.
Here is a list of every attach type, in order of importance/relevance.
| Constant | String | Attachment Description |
|---|---|---|
| PATTACH_ABSORIGIN_FOLLOW | follow_origin | Follows the movement of the target at its origin location |
| PATTACH_OVERHEAD_FOLLOW | follow_overhead | Follows the movement of the target over its head |
| PATTACH_ABSORIGIN | attach_origin | Starts at the origin of the target and stays there |
| PATTACH_POINT | attach_hitloc | Normally the body of the model, where the attack projectiles hit |
| PATTACH_POINT_FOLLOW | follow_hitloc | Follows the body |
| PATTACH_CUSTOMORIGIN | start_at_customorigin | Enables the attachment to a custom origin |
| PATTACH_CUSTOMORIGIN_FOLLOW | follow_customorigin | Follow the movement of the custom origin set |
| PATTACH_WORLDORIGIN | world_origin | Targets a Point entity in the world, use with "TargetPoint" key |
| PATTACH_EYES_FOLLOW | follow_eyes | Fills the screen, used for the damage stun or arcana drop indicator. |
| PATTACH_POINT_FOLLOW_SUBSTEPPED | follow_attachment_substepped | |
| PATTACH_RENDERORIGIN_FOLLOW | follow_renderorigin | |
| PATTACH_ROOTBONE_FOLLOW | follow_rootbone | |
| Attach to a specific bone | attach_attack1 | You can check these by opening the hero VMDL file in the Model Editor. |
| - | start_at_origin | |
| - | start_at_attachment | |
| - | follow_attachment |
Basically the engine will try to find the "bone" or attach point and type of the constant/string used, if the model has it and the particle is designed to properly attach to that point you will get a nice behavior.
Numerous times when dealing with complex particle systems you will get errors like:
- Particle children showing at the Vector (0,0,0).
- This is what normally happens when you miss a Control Point (explained later)
- Effect appearing in a different position than expected.
- Wrong attachment or particle can't attach that place.
Control Points
Control points are x,y,z values that are used to set the particle to a target entity location or a vector for radius, color, duration, speed, etc.
It's easier to understand them with examples, so we'll move through some basic particles that don't need specific control points and then see some that need them to display properly.
Decompiled Particles
With Reborn, now the default dota particles can be opened directly with the Particle Editor and make copies of them. Read more about this on the wiki in Particle Copy Tool
Examples
1. Simple buff particles, datadriven
This type of particles is the easiest to attach. They are tied to a modifier and automatically stop after the modifier is destroyed.
For this too, the particle system duration usually needs to be infinite, designed as a simple buff, internally they have a single control point which is set with the EffectAttachType key.
Example
"modifier_borrowed_time"
{
    "EffectName" "particles/units/heroes/hero_abaddon/abaddon_borrowed_time.vpcf"
    "EffectAttachType" "follow_origin"

    "StatusEffectName" "particles/status_fx/status_effect_abaddon_borrowed_time.vpcf"
    "StatusEffectPriority" "15"
}Status Effects are a particular type of particle that is generally applied to change the texture color of the hero, for things like illusions, ghosts, etc.
2. Basic attachment
When you want more than one particle attached to a modifier or the particle needs additional control points, you need to do it in a "FireEffect" or "AttachEffect" block instead.
"modifier_stampede"
{
    "OnCreated"
    {
        "AttachEffect"
        {
            "EffectName" "particles/units/heroes/hero_centaur/centaur_stampede_overhead.vpcf"
            "EffectAttachType" "follow_overhead"
            "Target" "TARGET"
        }
    }
}"Target" uses the same target rules as any datadriven block
3. Control Points
When the easy attachment procedure fails, it means the particle has Control Points to control certain properties like radius, position of multiple elements, color, etc.
To know what each CP controls, you need to open the particle in the Particle Editor. Now you will be able to double click any of the copied particles in the Asset Browser and try to understand how to set each CP
Control Points can be either set in the datadriven "AttachEffect" or in lua. Doing it in Lua has the advantage that you can dynamically reload the control points by doing script_reload after changing the code.
3.1 Lua Particle Attachment with SetParticleControl
Example
local particle = ParticleManager:CreateParticle("particles/units/heroes/hero_omniknight/omniknight_purification.vpcf", PATTACH_ABSORIGIN_FOLLOW, target)
ParticleManager:SetParticleControl(particle, 0, target:GetAbsOrigin())
ParticleManager:SetParticleControl(particle, 1, Vector(particle_radius,0,0))CP0 is not really needed (because this type of attachment already sets the particle to follow the AbsOrigin) but its nice to have.
CP1.x controls the radius of the particle, as seen in the Particle Editor after playing around with the values
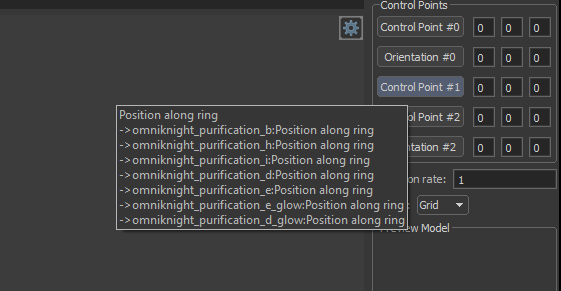
Hovering over the button tells us its a "Position along ring"
Example
local target = event.unit
local player = PlayerResource:GetPlayer( caster:GetPlayerID() )
local particleName = "particles/units/heroes/hero_alchemist/alchemist_lasthit_coins.vpcf"
local particle = ParticleManager:CreateParticleForPlayer( particleName, PATTACH_ABSORIGIN, target, player )
ParticleManager:SetParticleControl( particle, 0, target:GetAbsOrigin() )
ParticleManager:SetParticleControl( particle, 1, target:GetAbsOrigin() )In this particular case, we are using CreateParticleForPlayer to only display it to one particular player. Could also use PATTACH_OVERHEAD_FOLLOW
3.2 Datadriven "ControlPoints" block
The same can be translated to datadriven, except if you need the control points to be decided at runtime (like, doing a radius * some variable)
"FireEffect"
{
    "Target" "TARGET"
    "EffectName" "particles/units/heroes/hero_omniknight/omniknight_purification.vpcf"
    "EffectAttachType" "follow_origin"

    "ControlPoints"
    {
        "00" "0 0 0"
        "01" "%radius %radius %radius"
    }
}Keep in mind that a "FireEffect" or "AttachEffect" action can be inside any Ability or Modifier Event, not only on the "OnCreated" / "OnDestroy" Modifier Events.
Example:
"OnSpellStart"
{
    "FireEffect"
    {
        "EffectName"       "particles/units/heroes/hero_lina/lina_spell_light_strike_array_ray_team.vpcf"
        "EffectAttachType" "start_at_customorigin"
        "TargetPoint"      "POINT" //This also works with world_origin

        "ControlPoints"
        {
            "01" "%light_strike_array_aoe 0 0"
            "03" "0 0 0"
        }
    }
}4. Control Point Entities
Sometimes, particle attach points can get even more complicated when they need to be attached on specific locations or entities. If your attachment is not working with the simple lua method, you need to try the next level of control point setup, the Control Point Entities, in either Lua or Keyvalues.
4.1 Lua SetParticleControlEnt
Example: This is the proper lua attachment for Abaddon Aphotic Shield Particle:
target.ShieldParticle = ParticleManager:CreateParticle("particles/units/heroes/hero_abaddon/abaddon_aphotic_shield.vpcf", PATTACH_ABSORIGIN_FOLLOW, target)
ParticleManager:SetParticleControl(target.ShieldParticle, 1, Vector(shield_size,0,shield_size))
ParticleManager:SetParticleControl(target.ShieldParticle, 2, Vector(shield_size,0,shield_size))
ParticleManager:SetParticleControl(target.ShieldParticle, 4, Vector(shield_size,0,shield_size))
ParticleManager:SetParticleControl(target.ShieldParticle, 5, Vector(shield_size,0,0))

ParticleManager:SetParticleControlEnt(target.ShieldParticle, 0, target, PATTACH_POINT_FOLLOW, "attach_hitloc", target:GetAbsOrigin(), true)PATTACH_POINT_FOLLOW puts the particle at the targets body in this case. PATTACH_ABSORIGIN_FOLLOW will put it at its feet, and PATTACH_OVERHEAD_FOLLOW at its head.
Note the particle being defined under the target. handle, this is because we will need to destroy it later in Lua, because attaching a particle this way will not stop the particle effect by itself after the modifier is destroyed, as we are just tying the particle to a target. This is not a concern if the particle is meant for a short duration (unlike the buff particles that last forever until removed)
4.2 DataDriven "ControlPointEntities"
This works by setting each CP in order to its key. If you need to set the CP8 to a Targets hitloc, you need 8 "TARGET" (or "CASTER" or anything) lines.
Example
"modifier_aphotic_shield"
{
    "OnDestroy"
    {
        "AttachEffect"
        {
             "EffectName" "particles/units/heroes/hero_abaddon/abaddon_aphotic_shield_explosion.vpcf"
             "EffectAttachType" "follow_origin"
             "Target" "UNIT"
             "ControlPointEntities"
            {
                "TARGET" "attach_origin"
                "TARGET" "attach_origin"
            }
        }
    }
}Example 2
"modifier_return"
{
    "Passive" "1"
    "OnAttacked"
    {
        "RunScript"
        {
            "ScriptFile" "heroes/hero_centaur/return.lua"
            "Function" "Return"
        }
        "FireEffect"
        {
            "EffectName" "particles/units/heroes/hero_centaur/centaur_return.vpcf"
            "EffectAttachType" "attach_hitloc"
            "Target" "CASTER"
            "ControlPointEntities"
            {
                "CASTER" "attach_hitloc"
                "ATTACKER" "attach_hitloc"
            }
        }
    }
}Example 3
"OnProjectileHitUnit"
{
    "FireEffect"
    {
    "EffectName" "particles/units/heroes/hero_alchemist/alchemist_unstable_concoction_explosion.vpcf"
        "EffectAttachType" "attach_hitloc"
        "Target" "TARGET"
        "ControlPointEntities"
        {
            "TARGET" "attach_hitloc"
            "TARGET" "attach_hitloc"
            "TARGET" "attach_hitloc"
            "TARGET" "attach_hitloc"
        }
    }
}Example 4
Custom bones!
"AttachEffect"
{
    "Target" "CASTER"
    "EffectName" "particles/units/heroes/hero_kunkka/kunkka_weapon_tidebringer.vpcf"
    "EffectAttachType" "start_at_customorigin"
    "ControlPointEntities"
    {
        "CASTER" "attach_sword"
        "CASTER" "attach_sword"
        "CASTER" "attach_sword"
    }
}ControlPointEntities is the hardest method of Particle Attachment. Use it with caution and pride.
5. Stopping a Lua Particle
If the entity dies, it will normally destroy the particle.
To stop something like we created in the Aphotic Shield example, add a "OnDestroy" of the modifier with a RunScript that calls something like this:
function EndShieldParticle( event )
    local target = event.target
    target:EmitSound("Hero_Abaddon.AphoticShield.Destroy")
    ParticleManager:DestroyParticle(target.ShieldParticle,false)
endIf the particle has a fixed duration you can also easily use BMD Timers:
Timers:CreateTimer(duration, function()
    ParticleManager:DestroyParticle(particle,false))
end)6. Difference between "FireEffect" and "AttachEffect"
When used inside a modifier, AttachEffect will automatically stop the particle after the modifier is destroyed, while FireEffect won't (if the particle duration is infinite)
FireEffect is pretty much the same as doing the lua ParticleManager:CreateParticle in this sense.
So if you FireEffect with a particle of infinite duration inside a modifier, it will still live after the modifier ends.
If the particle duration has a short duration, using any of the 2 Effect actions has the same results.
7. Projectile Particles
There are two types of projectile particles: Linear and Tracking.
Linear follow a straight line and collide with anything in its path. Use "DeleteOnHit" "0" inside the "OnProjectileHitUnit" Ability Event if you want them to continue going up to its fixed distance.
Tracking can curve and follow a target movement. Every ranged attack particle is of this type.
LinearProjectile
DataDriven Example
"LinearProjectile"
{
    "Target" "POINT"
    "EffectName" "particles/units/heroes/hero_nyx_assassin/nyx_assassin_impale.vpcf"
    "StartRadius" "%width"
    "EndRadius" "%width"
    "MoveSpeed" "%speed"
    "TargetTeams" "DOTA_UNIT_TARGET_TEAM_ENEMY"
    "TargetTypes" "DOTA_UNIT_TARGET_HERO | DOTA_UNIT_TARGET_BASIC"
    "TargetFlags" "DOTA_UNIT_TARGET_FLAG_MAGIC_IMMUNE_ENEMIES"
    "FixedDistance" "%length"
    "ProvidesVision" "0"
    "HasFrontalCone" "0"
}Lua Example
--[[
    Author: kritth
    Date: 10.01.2015
    Start traversing the ship
]]
function ghostship_start_traverse( keys )
  local ability = keys.ability
  local casterPoint = caster:GetAbsOrigin()
  local targetPoint = keys.target_points[1]
  local spawnDistance = ability:GetLevelSpecialValueFor( "ghostship_distance", ability:GetLevel() - 1 )
  local projectileSpeed = ability:GetLevelSpecialValueFor( "ghostship_speed", ability:GetLevel() - 1 )
  local radius = ability:GetLevelSpecialValueFor( "ghostship_width", ability:GetLevel() - 1 )

    -- Get necessary vectors
    local forwardVec = targetPoint - casterPoint
            forwardVec = forwardVec:Normalized()
    local backwardVec = casterPoint - targetPoint
            backwardVec = backwardVec:Normalized()
    local spawnPoint = casterPoint + ( spawnDistance * backwardVec )
    local impactPoint = casterPoint + ( spawnDistance * forwardVec )
    local velocityVec = Vector( forwardVec.x, forwardVec.y, 0 )

    -- Spawn projectile
    local projectileTable = {
        Ability = ability,
        EffectName = "particles/units/heroes/hero_kunkka/kunkka_ghost_ship.vpcf",
        vSpawnOrigin = spawnPoint,
        fDistance = spawnDistance * 2,
        fStartRadius = radius,
        fEndRadius = radius,
        fExpireTime = GameRules:GetGameTime() + 5,
        Source = caster,
        bHasFrontalCone = false,
        bReplaceExisting = false,
        bProvidesVision = false,
        iUnitTargetTeam = targetBuffTeam,
        iUnitTargetType = targetType,
        vVelocity = velocityVec * projectileSpeed
    }
    ProjectileManager:CreateLinearProjectile( projectileTable )

endTrackingProjectile
DataDriven Example
"TrackingProjectile"
{
    "Target" "TARGET"
    "EffectName" "particles/units/heroes/hero_alchemist/alchemist_unstable_concoction_projectile.vpcf"
    "Dodgeable" "0"
    "ProvidesVision" "1"
    "VisionRadius" "%vision_range"
    "MoveSpeed" "%movement_speed"
    "SourceAttachment" "DOTA_PROJECTILE_ATTACHMENT_ATTACK_1"
}Lua Example
local projectile_speed = ability:GetSpecialValueFor( "projectile_speed" )
local particle_name = "particles/units/heroes/hero_abaddon/abaddon_death_coil.vpcf"

-- Create the projectile
    local info = {
        Target = target,
        Source = caster,
        Ability = ability,
        EffectName = particle_name,
        bDodgeable = false,
        bProvidesVision = true,
        iMoveSpeed = projectile_speed,
        iVisionRadius = 0,
        iVisionTeamNumber = caster:GetTeamNumber(),
        iSourceAttachment = DOTA_PROJECTILE_ATTACHMENT_ATTACK_1
    }
ProjectileManager:CreateTrackingProjectile( info )INFO
You can't generally use a particle designed to be Linear in a Tracking action and vice versa.
You might be able to mimic a Linear behavior using a Tracking projectile if you make it to track a dummy unit that can't move, but you need another invisible Linear projectile to do the hit effects.