Typescript Introduction
Typescript is a powerful tool that we can use to improve our ability to properly script files for Dota 2. Using tstl (Typescript-to-Lua), it automatically generates a Lua file for the game to use for each file you're working on - this process is completely automatic from the moment it starts up.
Typescript is more strict compared to Lua, will use types to enforce certain functionalities, and will immediately alert you if you do something that doesn't make sense to it, and will show an error until you fix it. For instance, doing GetStrength() on an ability doesn't make sense and will show an error message.
Typescript can work well with most editors using plugins, however, VSCode is recommended as it comes with Typescript support built in, and is a very powerful editor.
Pros and Cons for using Typescript
Pros:
- Enforces types, prevents you from using irrelevant functions.
- Typescript is much more similar to most languages such as C#, Java, Javascript, and C (compared to Lua).
- Auto-complete that will only show API functions that match the type being called.
- Saves a ton of time by immediately finding logical errors in code, instead of having to find them in-game (sometimes as edge cases which may not be found during local testing).
- Tremendous support of Typescript in the web (e.g. Stack Overflow) for common Typescript questions.
- Typescript itself comes with very powerful built-in functionalities and types, such as Sets, Maps, and array functionalities. Additionally, it supports class and types inheritance.
- Typescript is used for both Lua and Javascript, so you never have to switch between scripting languages; Typescript will convert it to the correct language for you.
- Auto-complete for various arguments in APIs, such as a built-in event list.
- Built-in enums and interfaces to make finding a specific Dota-based value extremely fast and easy.
- Very easy to update new APIs when Valve (eventually) releases new functions.
- Symlinks your Dota 2 folder for you as part of the setup, so you can easily integrate your changes into github, should you choose to do so.
Cons:
- Takes some time to set up for the first time.
- Some rare types may be incorrect. Those can be updated manually when the need arises.
- Sometimes, requires more of a set up for specific game logic, such as interfaces, typeguards and casts (this is again due to the nature of typed language).
- Not very convenient to integrate for ongoing projects, though it can still work.
- Referencing code or guides that are written in Lua might not be easy in Typescript due to differences between how the languages work.
Setting Up TypeScript
INFO
This guide assumes your operating system is Windows. If you have other operating systems, please contact us in the Typescript channel in the Discord below.
First, since Typescript uses Node.js, it must be installed on your computer. You can download NodeJS from here. Simply choose the recommended version, which is the latest stable version. Download and install it with its default configuration.
Next, navigate to the Typescript template. This template has most of the files of a new addon configured for you, along with Typescript support. There are two versions to use the template:
Without GitHub: if you're not planning to put your code in GitHub, clone the above template. See below for explanation how.
With GitHub: if you do plan on putting your code in GitHub, click on the
 button located in the top right of the github page. This will create a new github repository that uses the template under your name. Fill in the repository name, description, and whether it is public or private. You can leave "Include all branches" unchecked, then click "Create repository from template". When the new repository is created, clone it. See below for explanation how. For those unfamiliar with github, I recommend using a Github GUI, such as Github Desktop.
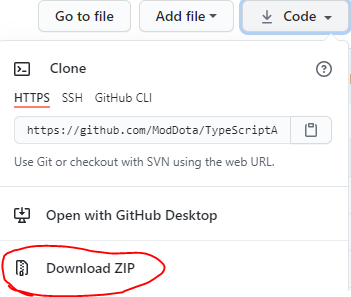
Cloning the repository means making a copy of it on your computer. This can be done by clicking on "Code", then on "Download Zip", as shown here:
You can then extract the ZIP anywhere you want. However, do NOT put it inside your Dota 2 folder. For example, I placed it in my Desktop, inside a folder named "Dota 2 custom games". The folder that becomes extracted is named TypeScriptAddonTemplate-master, so just rename the folder to more correctly reflect your custom game's name. For the sake of this tutorial, I named it typescript-example.
Creating a Typescript-based addon in Dota
Now that we have the files on our computer, we can set up a new addon game very quickly. There are a few steps remaining before doing so:
- Go into your folder, in my case
typescript-example. - Open
package.jsonwith any text editor. You'll notice that thenamefield is an empty string. Add the name of your custom game. For example, I named ittypescript_tutorial. The field should look like this:
"name": "typescript_tutorial",Save and close the file.
INFO
Make sure there is no folder with that name inside both the game/dota_addons and content/dota_addons of your Dota 2 game folder. The installation process will create those folders for you. If the folders exist, delete them first, or change the name in package.json to something else.
- While inside the folder with the
package.jsonfile you just edited, click on the address bar, so the path to your folder becomes highlighted and editable as text. It should look like this:

While the path is highlighted, delete the text and instead type "cmd" and press Enter. This will open the Command Shell with the folder path shown right before your input cursor.
Type
npm installand press enter. You'll see a loading bar, which should take up to a minute to complete. If it was successful, you should see that yourgameandcontentfolders now have a "shortcut" icon next to them. They're now symlinked to your Dota 2 folder. Thetypescript_tutorialfolder now exists for bothgame/dota_addons/andcontent/dota_addonsin your Dota 2 folder.
INFO
Symlinked folders are copies of each other, where any action done on one is also applied on the other folder. Therefore, you can simply work on your conveniently placed folder (Desktop/Dota 2 custom games/typescript-example in my example), and it will automatically be applied on the Steam Dota 2 folder as well.
Typescript Addon Structure
Most of the structure for Typescript is identical to a standard Dota addon, such as having the scripts/npc/ folder.
Note the src folder in the project's root. This is where you create and work on your Typescript files. When they're compiled, the resulting Lua files are placed in the appropriate locations, such as /game/scripts/vscripts/ for files produced from /src/vscripts/. You can add additional folders inside those folders, which will keep the same routing in the output location.
You can change the structure of the folders inside the addon. However, you might need to adjust the output paths to match those changes. Some changes might break the mod, as Dota expects a specific structure to be set up (such as game/scripts/vscripts).
INFO
In src, you'll also find the common folder. This folder is extremely useful for storing interface declarations that are shared between game logic and panorama, such as events and nettables, among other custom declarations such as enums. This folder should only include d.ts files.
There are a few additional files and folders responsible for making Typescript identify and work with Dota 2 API, and in the custom game in general. Most of those files can be left untouched. Most of those files are located at /src/vscripts/ folder:
tsconfig.json: Configures how Typescript works in the Lua portion of the project. The same type of file exists in the/src/panorama/folder for javascript configuration for panorama.vscripts/lib/dota_ts_adapter.ts: Responsible for registering various common classes, such as abilities, items, and modifiers.vscripts/lib/tstl-utils.ts: Responsible for the typescript-to-Lua translation.vscripts/lib/timers.luaandvscripts/lib/timers.d.ts: The common Timers library is already included by default in its Lua form, with timers.d.ts including an interface to allow using the Timers library in Typescript.
Updating Your Addon
Occasionally, Valve will release new API or changes to existing API, usually at events and major patches. Your Typescript project will not automatically adjust to those changes as they need to be filed and typed first, which is usually done by the community who maintain Typescript template. However, when a new update is announced for Typescript for Dota 2, you can easily update your project. There are two ways to do so:
Using VSCode's terminal: If your chosen editor is VSCode and it has your project's folder loaded, click on Terminal -> New Terminal. A new terminal will open. Type
npm updateand press Enter.Using cmd: Open cmd from your project's root directory (
Desktop/Dota 2 custom games/typescript-examplein my example), then typenpm updateand press enter.
The project will update to the newest version automatically.
Activating The Watcher
In order for your files to compile and have their compiled Lua or javascript equivalents, it is required to activate the watcher. The watcher watches over all changes done on your files in the project, and immediately produces a Lua or javascript equivalent, assuming the file compiled with no errors. There are three ways to activate the watcher:
Using VSCode's terminal: If you're using VSCode and it has your project's folder loaded, click on Terminal -> Run Build Task. Alternatively, you can use the hotkey for it, default
Ctrl+Shift+B.Using cmd: Open cmd from your project's root directory (
Desktop/Dota 2 custom games/typescript-examplein my example), then typenpm run devand press enter.Other editors: Depending on the editor, the editor might have their own method to invoke a Run Build Task command; check the editor's documentation for more details.
Normalized types
When dumping enums from Dota's API, it comes with some predefined types. Some of those types are not very convenient to work with, so instead, we use the normalized types. Those normalized types change enums slightly, and their purpose is to increase readability of your code. The template comes with the normalized types already activated.
Integrated Examples
As of writing this tutorial, the Typescript template comes with a few examples to show how game logic is done in Typescript. I recommend keeping those files for reference until you're more comfortable with Typescript.
The examples are:
- In
src/vscripts/abilities/heroes/meepo/earthbind_ts_example.ts: A custom Meepo's Earthbind ability example. - In
src/vscripts/modifiers/modifier_panic.ts: A custom modifier that restricts commands and orders the parent to periodically move to a random position near it. - In
src/vscripts/GameMode.ts: Game mode logic examples, such as setting the maximum players for each team to 3. Timer and event listening examples are also shown here. - In
src/panorama/hud.ts: Panorama example for subscribing and sending events.
You can see how the examples apply in your addon:
- Each hero you pick will have the custom Meepo's Earthbind ability added to it.
- A welcome UI panel is shown in the center of the screen. Clicking on the close button in it will remove the panel and apply the panic modifier for a few seconds.
Dedicated Typescript Channel in Moddota Discord
We have a dedicated Typescript channel in our moddota Discord for every Typescript related question. Feel free to join and ask anything and we'll be happy to assist.
What's Next?
Check out the Abilities in Typescript tutorial, which will show how to set up and code a basic ability to use in the game.