Scripting Introduction
Part 2 of Getting Started With Dota 2 Modding, this tutorial is meant to explain the basics of programming Dota 2 custom mods.
Scripting
So now you have your freshly created gamemode running and have played around the map editor a bit, it's time to move into the programming realm of Dota 2 custom maps.
Go into your <addonName>/scripts/ folder. The 2 main script folders are npc and vscripts. The first holds the following .txt files:
npc_abilities_custom.txt- Contains all the custom abilities of the gamemode.npc_heroes_custom.txt- Heroes with its abilities and statsnpc_items_custom.txt- Items are abilities that go into a units inventorynpc_units_custom.txt- All the data for non-hero units like buildings or creatures.npc_abilities_override.txt- Modified dota abilities/items with changed values.herolist.txt- List of the heroes available for picking.
These files are defined using KeyValues (KV) and are the core of the DataDriven system. While they fulfill the definition of a programming language, it's more like a big table containing all the possible data in a static document. It uses a relatively simple syntax whose only special characters are curly braces and quotes, with alternating sets of "Key" and "Value" or "Key" {table} pairs, where table is another set of KeyValues.
KV will define the data of abilities/items/units, while more elaborate behavior is handled with Lua or TypeScript.
Each .txt file contains its particular KVs, and when the game starts, each client (and server) will interpret them. Changes to these files won't take effect until the game is started again, so be very aware of the syntax, as any extra/missing " or { } will usually make all the keyvalues that come after this error unusable. Consistent indentation is a good practice to learn early! KV is case-sensitive, so also pay attention to write everything like the game expects you to write. If your KV is not working, try putting it into the KV checker to look for errors.
Now it's a good time to get your environment ready to write Dota Scripts. For this, the best way is getting Visual Studio Code. Use VSCode to open your addon root directory using File > Open Folder...
Running and testing your game
Once your environment is set up you can try to run your addon. Open the workshop tools (if you can't find them, they are in /Steam/steamapps/common/dota 2 beta/game/bin/win64/dota2cfg.exe, bookmark this) and select your addon.
Once the asset browser has launched, open the Console from the buttons at the top. To launch your addon simply type the following command into the bottom of the console:
dota_launch_custom_game <custom_game_name> <map_name>If you have not done so, you will first need to build your map using Hammer before you can launch your game on it. You can also run your game on the default Dota 2 map using:
dota_launch_custom_game <custom_game_name> dotaAfter this command, you will enter a game with your addon rules. If you want to restart the game to reload the scripts, simply repeat the launch command (by pressing the up arrow in Console), or by typing restart in console.
Lua/TypeScript Scripting
Going back to the game/scripts folder, there's the vscripts folder. Here is the place where all the Lua/TypeScript scripts are placed.
Game Logic
In every single gamemode, a file named addon_game_mode.lua must be present. While it is possible to add the game logic to this file (and in fact, Valve did so in their holdout example), it is recommended that you reserve this file only for these 2 functions:
Precache, when the game starts and players pick their heroes, the engine will try to load the associated models/particles/sounds to those heroes. If we're dynamically using a resource in Lua before preloading it won't be displayed properly.Activate, creates the base game mode entity and calls the initialize function.
--[[
    Basic Barebones
]]

-- Required files to be visible from anywhere
require( 'timers' )
require( 'barebones' )

function Precache( context )
    -- Precache things here
end

-- Create the game mode when we activate
function Activate()
    GameRules.GameMode = GameMode()
    GameRules.GameMode:InitGameMode()
endUsing our barebones, you don't need to touch this file apart from very specific situations, and all the core game logic will be coded in gamemode.lua (for older versions it's barebones.lua), which has been already required. We'll call this your main lua file from now on.
After addon_game_mode Precache & Activate are finished, the first function to be executed in the barebones.lua file is GameMode:InitGameMode().
In here the game starts by initializing all sorts of rules and functions, which are registered over the GameRules and GameMode entities. For this, many variables are defined in settings.lua file to help organizing options like gold settings, kills, custom levels, etc.
This is the syntax of a function applied over GameRules, with one bool parameter:
GameRules:SetHeroRespawnEnabled( ENABLE_HERO_RESPAWN )
Just as KV, Lua is Case Sensitive. Also the placement of the functions within your main Lua file doesn't generally matter. All the script lines within a function call will be run one after another, potentially on the same frame; one frame in Dota is 1/30 of a second.
Note the use of : colon before the function. In Lua, this is how we access the various Game API functions. We say that GameRules is an HScript or a handle. Handles are basically huge tables, with all the pertinent info of the entity. Over the Scripting API page you'll see many different types of functions which can use different handles.
Global functions don't need any handle : prefix. Heroes, Creatures, Abilities and Items all have their different handle classes and attempting to call a function over an incompatible class will cause a VScript error, as pink text in console and red text on the gamescreen.
The Console
You can access the game console by pressing the ` key.
This will provide tons of useful information for debugging. The different colors represent the various "channels" of information. By default all the channels are in the same Log: Default tab. It's very recommended that you make your own tabs to split the log viewer.
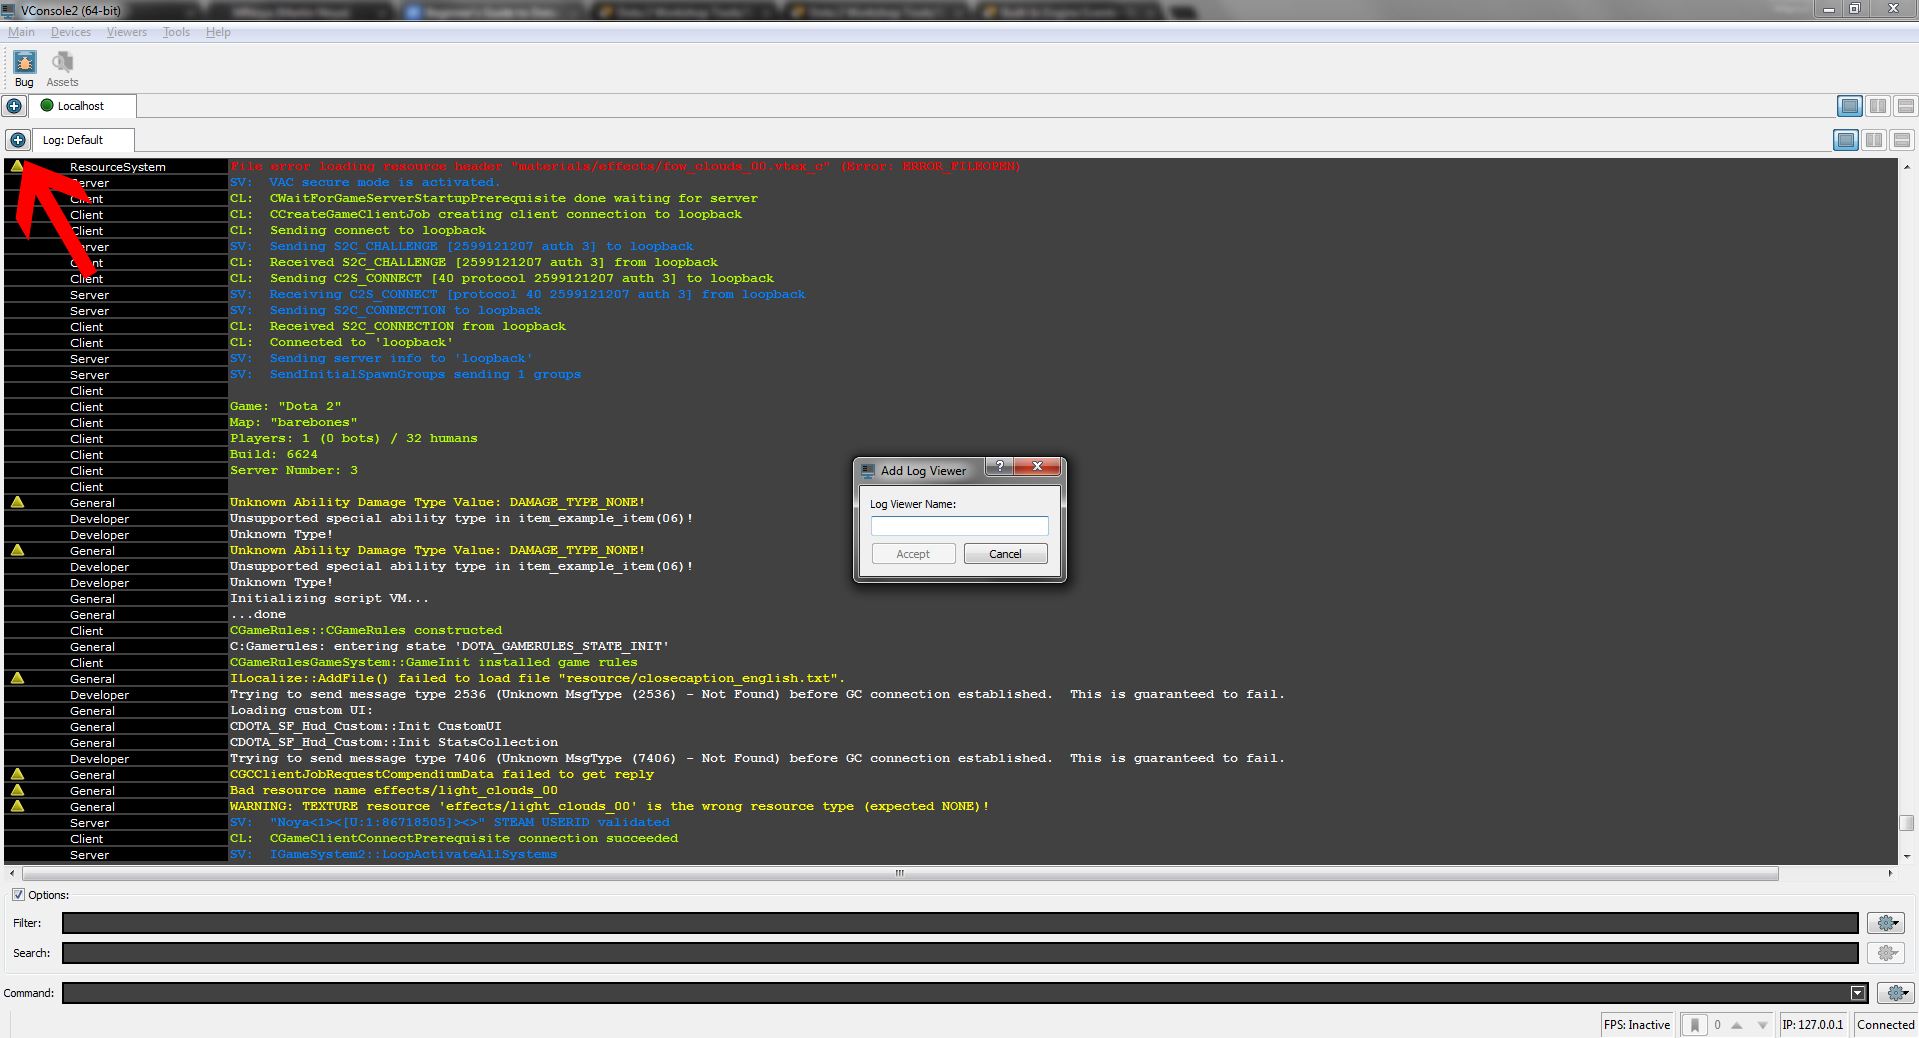
For Lua Scripting, we want to have a VScript Tab. Messages about the DataDriven system are in the General channel in yellow along with some other info, make a separate viewer for this too.
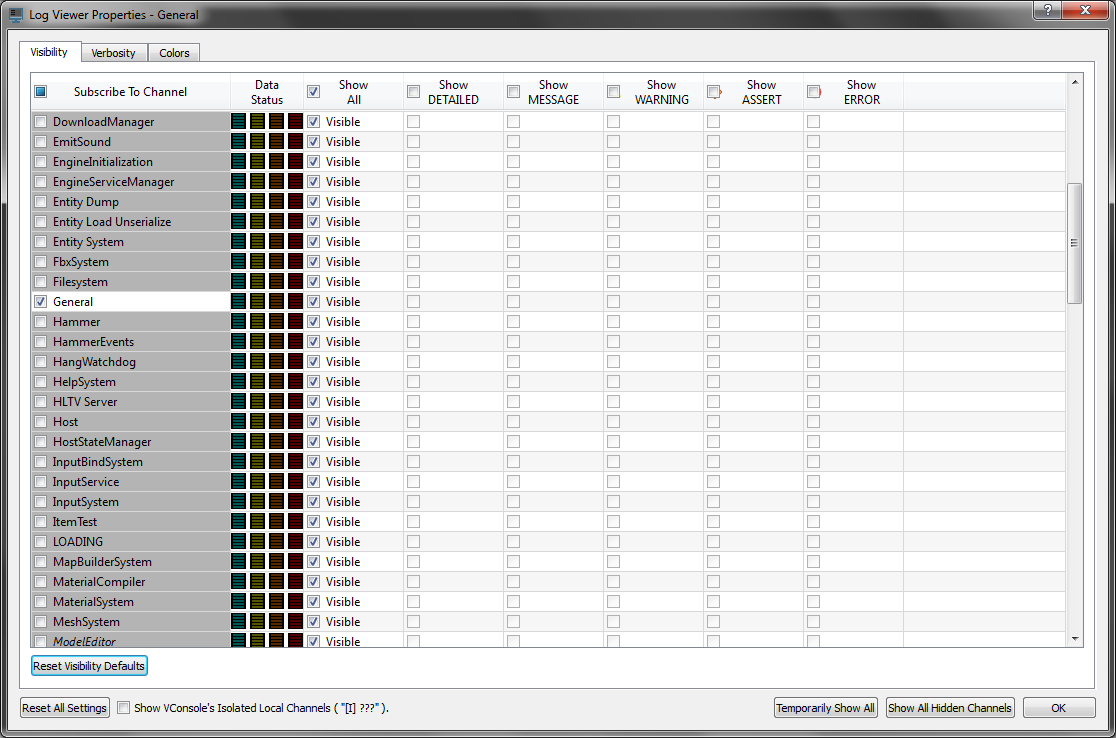
The new tabs:

The console will notify whenever a Lua scripting error happens, either when the game is being loaded (a syntax-compilation error) or at runtime. In this error, I wrote GameRules.SetHeroRespawnEnabled with . instead of :

You can then trace the error to that line and attempt to solve it, writing script_reload in the console to reload the script and check if it was actually fixed.
A DataDriven syntax error will usually look like this:

Engine Events
The second segment of the InitGameMode function is the Listeners:
ListenToGameEvent('dota_player_gained_level', Dynamic_Wrap(GameMode, 'OnPlayerLevelUp'), self)
The structure of this ListenToGameEvent is read as:
Whenever the dota_player_gained_level event is triggered, execute the scripts inside the OnPlayerLevelUp function.
OnPlayerLevelUp and GameMode (or barebones in updated version) are just the names of the function and main class name we came up with, normally you don't need to worry about them, all Listeners and functions are already available in barebones, ready to be expanded. Dynamic_Wrap is a function to ensure that the script_reload command also reloads the listeners. script_reload restarts lua scripts at runtime, unlike DataDriven files which require the game to be fully restarted. As you can see on the barebones example there are tons of possible events, and not all of them are listed there, those are just the most used ones.
The 3rd and last part of the InitGameMode in simplified Barebones are self defined variables to track info. These use the self. entity, which is a local reference to the GameMode entity, seen through all the functions inside the main lua file. Adding information to an entity like entity. is loosely called "indexing" and is basically adding another entry to the big table of that entity. This is very useful because this information is stored under the entity handle visible everywhere, and won't change until we reassign it or destroy it.
Enough theory, let's see how this all comes together. Let's take a look at OnNPCSpawned function, which is the listener for npc_spawned and triggers every time a unit or hero entity is added to the map.
Let's analyze the contents of the OnNPCSpawned default function:
-- An NPC has spawned somewhere in game.  This includes heroes
function GameMode:OnNPCSpawned(keys)
    print("[BAREBONES] NPC Spawned")
    DeepPrintTable(keys)
    local npc = EntIndexToHScript(keys.entindex)

    if npc:IsRealHero() and npc.bFirstSpawned == nil then
        npc.bFirstSpawned = true
        GameMode:OnHeroInGame(npc)
    end
end// An NPC has spawned somewhere in game. This includes heroes
public OnNPCSpawned(event: NpcSpawnedEvent) {
print("[BAREBONES] NPC Spawned");
DeepPrintTable(event);
const npc = EntIndexToHScript(event.entindex);
if (npc.IsRealHero() && npc.bFirstSpawned == undefined) {
npc.bFirstSpawned = true;
OnHeroInGame(npc);
}
}First line will print the string in the VConsole. The print function is native to Lua, and accepts multiple parameters separated by commas.
DeepPrintTable is a Global Valve-made function which will display the information of the table passed. For keys in this case, it will be the .entindex and .splitscreenplayer. The entity index is a very important number to reference the entity. Ignore splitscreenplayer, it's just legacy source stuff and never used in Dota 2.

The next line defines a local variable. In Lua local variables have their scope limited to the block where they are declared. It is good programming style to use local variables whenever possible. Local variables help you avoid cluttering the global environment with unnecessary names. Moreover, access to local variables is faster than to global ones.
local npc = EntIndexToHScript(keys.entindex)
This is basically reading the information that is provided by the event, and storing it into a local variable within that function call. In this example all the Listener and their functions have already been processed, but for reference you can always check the Built-In_Engine_Events wiki page to know exactly what parameters are carried by each event.
The npc local variable is an HScript, of handle type. All changes done into the npc variable will reflect on spawned unit.
The next line is a conditional, first it checks if the npc is a real hero (this excludes illusions) and it also checks if the .bFirstSpawned index (a self-defined variable) has not been assigned yet. If both conditions are true, changes the boolean value to true and calls the OnHeroInGame function.
To finish this basic Dota Lua tutorial, let's modify the OnNPCSpawned function so that if a unit named npc_dota_neutral_kobold is spawned, wait 1 second and then kill itself. Added to the first if statement there's this else-if condition:
function GameMode:OnNPCSpawned(keys)
    local npc = EntIndexToHScript(keys.entindex)

    if npc:IsRealHero() and npc.bFirstSpawned == nil then
        npc.bFirstSpawned = true
        GameMode:OnHeroInGame(npc)
    elseif npc:GetUnitName() == "npc_dota_neutral_kobold" then
        Timers:CreateTimer( 1.0 , function()
            npc:ForceKill(true)
        end)
    end
endpublic OnNPCSpawned(event: NpcSpawnedEvent) {
const npc = EntIndexToHScript(keys.entindex);
if (npc.IsRealHero() && npc.bFirstSpawned == undefined) {
npc.bFirstSpawned = true;
OnHeroInGame(npc);
} else if (npc.GetUnitName() == "npc_dota_neutral_kobold") {
Timers.CreateTimer(1.0, () => {
npc.ForceKill(true);
});
}
}Here we make use of the Timers library for a simple 1.0 second delay, there are many different timer functions included and explained in timers.lua. The bool on ForceKill is to enable the death animation.
Tables
Tables are the most important structure we will have to use. As mentioned before, all the info on entities can be seen as a table (even though it's technically a pointer to a C++ object), and you Get and Set the values through the various Game API functions.
There are some functions in the API that return a table of entity handles.
Let's say you want to find all the units near the spawned kobold unit and kill them. The function FindUnitsInRadius can be used for this purpose, and takes a lot of parameters with different types which is worth explaining:
table FindUnitsInRadius(int teamNumber, Vector position, handle cacheUnit, float radius, int teamFilter, int typeFilter, int flagFilter, int order, bool canGrowCache)
The parameters have to be in this order. This function is a global, so no handle: needed, but we need to keep the table under a variable, like this:
local units = FindUnitsInRadius(...)
For the teamNumber, finding out which team an entity is in can be done with GetTeamNumber() on the npc handle. As for the other Filter parameters, instead of real integers, we use a bunch of Constants that represent different number values. The complete list of Constants is found on this wiki page.
A Vector is represented as Vector(x,y,z) coordinates. The function to get the position of a particular unit is called GetAbsOrigin and takes a npc handle.
As for the cache parameters, just leave it nil and false, they aren't of much use generally.
The complete function call to get the heroes in 500 radius from the spawned kobold would be:
local units = FindUnitsInRadius(npc:GetTeamNumber(), npc:GetAbsOrigin(), nil, 500,
                                DOTA_UNIT_TARGET_TEAM_ENEMY, bit.bor(DOTA_UNIT_TARGET_BASIC, DOTA_UNIT_TARGET_HERO),
DOTA_UNIT_TARGET_FLAG_NONE, FIND_ANY_ORDER, false)const units = FindUnitsInRadius(
npc.GetTeamNumber(),
npc.GetAbsOrigin(),
undefined,
500,
UnitTargetTeam.ENEMY,
UnitTargetType.Basic | UnitTargetType.HERO,
UnitTargetFlags.NONE,
FindOrder.FIND_ANY_ORDER,
false,
);The use of extra break lines is just to make it more readable. Now we want to iterate over the entities of this table, which is done like this:
for key, unit in pairs(units) do
    print(key, value)
    unit:ForceKill(true)
endfor (const unit of units) {
unit.ForceKill(true);
}The key and unit are the chosen names to refer to the position and value inside the units table, which will be read in pairs. Using _ as the name of the key is a good convention when you want to make it clear that the first parameter won't be used. The 2nd parameter, unit, is used to iterate handles of the units found.
There is one more thing to consider: the "wait one frame" issue. Because all units are actually spawned at the (0,0,0) coordinates and then moved to the desired position, many times you'll need to create a 0 second timer (executes next frame) for some scripts to work, and this is one of those cases.
So, OnNPCSpawned is looking like this:
function GameMode:OnNPCSpawned(keys)
local npc = EntIndexToHScript(keys.entindex)
if npc:IsRealHero() and npc.bFirstSpawned == nil then
npc.bFirstSpawned = true
GameMode:OnHeroInGame(npc)
elseif npc:GetUnitName() == "npc_dota_neutral_kobold" then
Timers:CreateTimer(0, function()
local units = FindUnitsInRadius(npc:GetTeamNumber(), npc:GetAbsOrigin(), nil, 500,
DOTA_UNIT_TARGET_TEAM_ENEMY, DOTA_UNIT_TARGET_HERO,
DOTA_UNIT_TARGET_FLAG_NONE, FIND_ANY_ORDER, false)
for key, value in pairs(units) do
print(key, value)
value:ForceKill(true)
end
end)
end
endpublic OnNPCSpawned(event: NpcSpawnedEvent) {
const npc = EntIndexToHScript(keys.entindex);
if (npc.IsRealHero() && npc.bFirstSpawned == undefined) {
npc.bFirstSpawned = true;
OnHeroInGame(npc);
} else if (npc.GetUnitName() == "npc_dota_neutral_kobold") {
Timers.CreateTimer(() => {
const units = FindUnitsInRadius(npc.GetTeamNumber(), npc.GetAbsOrigin(), undefined, 500,
UnitTargetTeam.ENEMY, UnitTargetType.Basic | UnitTargetType.HERO,
UnitTargetFlags.NONE, FindOrder.FIND_ANY_ORDER, false);
for (const unit of units) {
  unit.ForceKill(true);
}
});
}
}And the result in-game:
Scripting Examples and Sources
There are plenty of examples spread all across GitHub and with the contents of this guide you should now be able to understand the scripting flow of game logic and scripted abilities. The best GitHub repo to look for Dota 2 spells is Elfansoer's dota 2 abilities library.
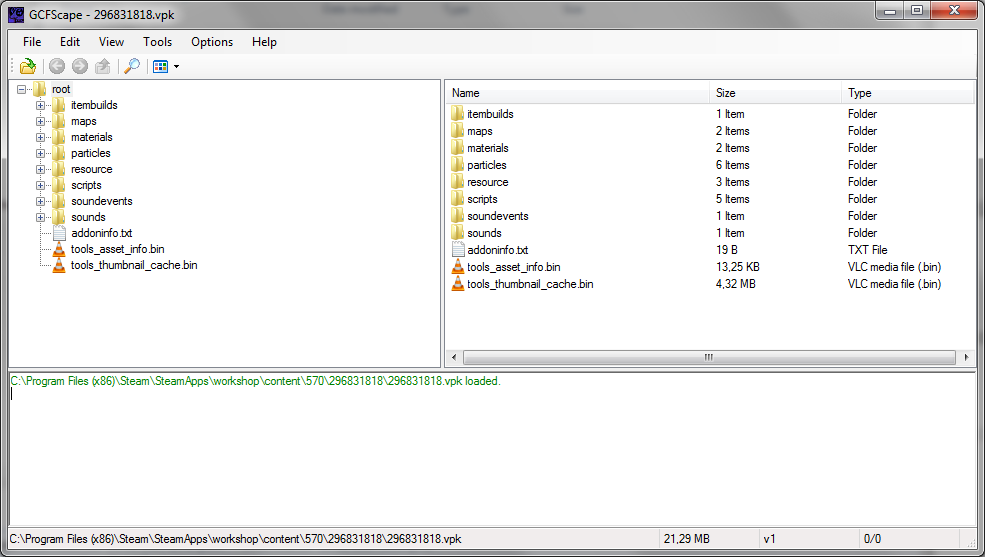
If you want to check the scripts of a certain game on the Custom Games Workshop which hasn't made their source public on GitHub (because they are fools), just follow these steps:
- Subscribe to the game. Download Source 2 Viewer if you haven't done so yet.
- Open Explorer in the app.
- Open the workshop vpk.
Manually:
- Check the URL, steamcommunity.com/sharedfiles/filedetails/?id=copy this number
- Go to your Steam folder -> SteamApps -> workshop -> content -> 570 (this is the dota folder)
- Search for the copied number folder
- Open the
.vpkfile with GCFScape or S2V and extract its contents anywhere you want. Now you can access its scripts and compiled models/particles/sounds.
Whenever you have a doubt about how to use a particular GameAPI function, it's possible to find examples all over GitHub by just writing the name of it, additionally filtering by lua like this:

Just make sure it's actually Dota Lua and not another game API, as some of the functions might share names with other engines.
That's all for the Scripting basics. For more questions, the community's Discord channel is available for help 24/7.